A lot of us think of pumpkins as what you purchase once a year to carve up for Jack-o-lantern making. Some of us also consider the cans of puree for pumpkin pie at Thanksgiving. But with a bit of forethought and effort, that Jack-o-lantern could be repurposed into nutritious and delicious foodstuffs.
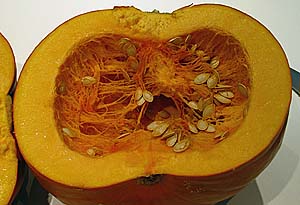
 This past weekend, I bought a plain old $5 medium-sized pumpkin from the big bin at the grocery store. My sole intention was to examine the process of breaking it down and turning it into puree. Yesterday, I embarked on my task. Step one was to cut the pumpkin in half. Since the pumpkin weighed in around 14-15 lbs, this was no easy task. After carefully washing and drying it, I took my heavy chef’s knife to it. After a fair amount of elbow grease and carefully balanced turning and cutting, the pumpkin was cut in half. This may well be the first time that I’ve wished for the existence of a meat cleaver in my kitchen (I’m assuming that the added heft of the cleaver would’ve made shorter work of the pumpkin cutting.
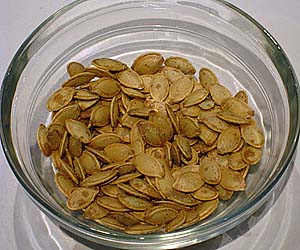
From there, I carefully dug out all the seeds and stringy parts with a large spoon, dumping the pumpkin guts into a colander as I went. Then I took my colander over to the sink and thoroughly washed off the seeds, detaching the pulp and discarding it as I went. Next I spread the seeds out on a half sheet pan so they could spend the day drying out in preparation for roasting later on.
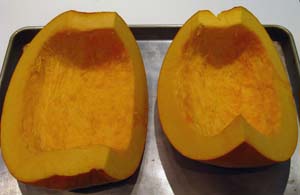
I split the pumpkin halves again in half so that I had four lengthwise quarters and carefully cut the stems from each of the quarters. I tried out two approaches to roasting the pumpkin. The first two quarters were roasted flesh side up in a 400 degree (F) oven for about an hour (toward the end of cooking, poke the flesh with a fork or small knife every so often to see if it has softened sufficiently). This made the outside of the flesh sort of dry, but it was still workable. For the second two quarters, I roasted them skin side up. This seemed to work better, but still was probably not ideal. (Were I to try it again, I would likely test either wrapping the pumpkin in aluminum foil or possibly dumping a bit of water in the pan to allow the pumpkin to steam a bit and retain its moisture).
UPDATE: I roasted another pumpkin this year (2009), this time a pie pumpkin. I roasted it in halves instead of quarters and dumped about a cup of water in the cookie sheet. It seemed to do the trick. Perfectly cooked pumpkin and no leathery flesh.
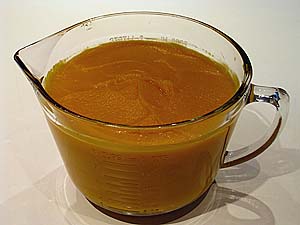
Once the pumpkin had cooled, I dug the now soft flesh away from the skin with a spoon and carefully pureed the pumpkin. My Vitamix again came in very handy here; it made very quick work of the pumpkin and produced a smooth, golden puree. By the way, it is considered unsafe to can pureed pumpkin. It is acceptable to pressure can pumpkin chunks, but not puree. So instead, I opted to freeze mine. I carefully scooped the puree in two cup measures into quart-sized freezer bags and allowed it to freeze. My one pumpkin yielded about 16 cups of puree.
Yesterday evening, I roasted my seeds. Loosely following the instructions from The Pioneer Woman Cooks, I tossed my seeds in a bit of canola oil (maybe 2 teaspoons or so for one pumpkin’s worth of seeds). Then I sprinkled them with a bit of sugar and salt and ground cumin and tossed again to distribute the seasonings evenly. Finally I baked them in a 250 degree (F) oven for about an hour and 15 minutes, stirring a couple of times through the process. I let them cool a bit and began snacking. I am sorry to tell you that I did not measure them before I began chowing down, but I’m guessing that my one pumpkin yielded about a cup to a cup and a quarter of nicely roasted seeds.
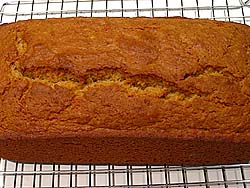
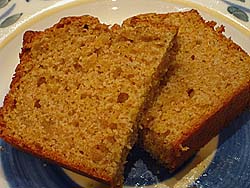
With my newfound bounty of puree, I decided to make pumpkin bread. This recipe would be a good base to add all sorts of goodies to (I was initially thinking of the pistachios and dried figs hiding in out pantry).
My initial thought was that the only way to use a pumpkin for Halloween decoration and for making puree was that you’d have to leave your pumpkin uncut and decorate the outside either with paste on decorations or magic marker or the like. But my friend had a better suggestion. Simply carve your jack-o-lantern the day before or the day of the holiday, enjoy it till the holiday is over (preferably with a candle that doesn’t leave a toxic or oddly aromatic film inside your pumpkin), and then wash thoroughly and treat as described above.