While I love chiles in all their various forms, one of my favorite ways to enjoy them is to roast them. Roasting them imparts a lightly smoky flavor and allows me to rid them of their tough, sometimes bitter skins. While I’ve roasted chiles in a variety of ways, this is the method that I find the simplest and most consistent.
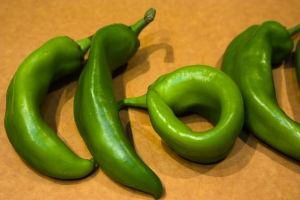
The first step is to select a medium- to thick-fleshed pepper for roasting. Peppers that work exceedingly well are things like bell peppers, jalapenos, Anaheims, poblanos, hatches, etc. (For thinner-fleshed peppers such as habaneros, this method may work, but since the flesh is so thin, it’s unlikely you’d be able to peel them without tearing the pepper apart. I would instead recommend lightly grilling them and incorporating them skins and all into whatever you’re including them in). Choose a pepper that is firm and heavy for its size. If the flesh yields to the touch or the skin is puckered, peeling will be more difficult. As with any vegetable, thoroughly wash and dry your peppers.
Some folks’ hands are quite sensitive to the capsaicin (the compound in peppers that supplies that lovely burn) in chiles, and some chiles are more capsaicin-rich than others. To keep from having stinging fingers (or later rubbing your eye and having a stinging eye), it is wisest to wear latex or vinyl gloves while working with chiles. Because I am a glutton for punishment, you will notice that I did not cover my hands prior to handling my peppers. (Fear not, anything with a Scoville rating much above that of a serrano, and I’m donning the gloves.)
Turn the broiler on to preheat, and move your oven rack up to the oven’s highest position. (Please note: These instructions assume that the heating element for your broiler is at the top of your oven.)
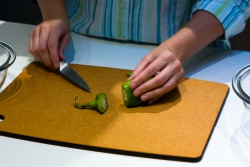
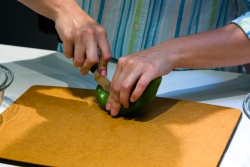
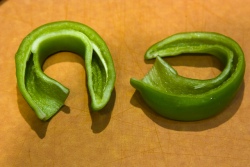
For each chile, do the following. With a well-sharpened paring knife, cut off the stem end and discard. Next, carefully slice the chile in half lengthwise, being certain to orient your cut in such a way that allows the chile to lay flat for roasting (this was particularly important for the curly hatches I was working with in the photos). Carefully clean the seeds from the insides of the chiles. Here’s where personal preference comes into play. I dislike the hard seeds, but I love the meaty ribs. Feel free to remove as much or as little of the peppers’ innards as you see fit.
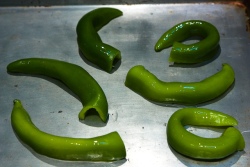
Once all your chiles are cleaned and cut up appropriately, toss them in a bit of vegetable oil. You’re looking to have at least the skin-sides of all the chiles very lightly coated in oil. Next lay them out skin-side up on a rimmed baking sheet (just in case some juice leaks out of your peppers), spacing them out so that they’re not touching one another. The oil will help the skins char more quickly, which in this case is exactly what you’re wanting.
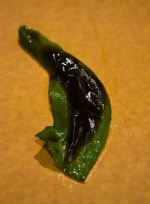 Do not do this next step if you must walk out of your kitchen for any reason. If you have to make a call, grab a beer, use the bathroom, whatever, do it before beginning this next step. It’s time to place them under the broiler. Things happen pretty fast at this point. Chuck your baking sheet in the oven and frequently check the state of your peppers. You’re looking for the skins to be largely charred, and the bits that aren’t charred should look sort of wrinkled up and loosened. Very rarely do all my peppers seem to be finished at the same time. I check the baking sheet frequently and remove them as they seem to be sufficiently charred, moving my other chiles around a little if needed. As they finish, remove your peppers to a cutting board to cool.
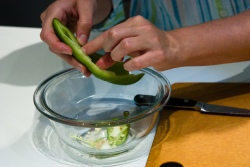
 Once the chiles are cooled, it’s time to peel them. If you have ever roasted peppers before, this is probably the part you really hate. Find a loosened spot of skin and gently pull it off with your fingers. This can be a bit tedious, but if you’ve charred your peppers well, the skin should come off fairly easily. In the batch I worked on for these photos, there were a few in there that I was able to pull the skin off in a single piece. Once all the skins have been removed, the roasted peppers can be used right away, refrigerated, or even frozen.
Now, this method is not the one that’s traditionally employed. Here is how the traditional method compares. You do not oil the chile (resulting in a slightly longer roast and a slightly mushier chile). You place the whole chile under the broiler (this could be good or bad - you can more easily roll the pepper around to get an even char - but on the other hand, you will have to roll the pepper to get an even char). When the broiling is finished, you place the chiles in a paper or plastic bag to steam and allow the skins to loosen (meaning they’ll cool more slowly). And once you’re done removing the skins and the chiles are good and slippery, you must stem them and remove the seeds (if you’re so inclined). I think it’s obvious which method I favor.
There is one other method worth mentioning. I once went to a cooking class put on by Jeff Blank of Hudson’s on the Bend. His method for roasting peppers was to take a kitchen torch to the peppers to lightly and quickly char the skin. Then once the charring was complete, he took a towl and simply wiped off the char. Ta-da, we had a roasted and skinned pepper whose flavor was fantastic and whose flesh was still fairly firm. It was a very elegant solution for any of you that are in possession of a kitchen torch. For my part, I’ll have to stick with my broiler.